Monday, July 23, 2018

SpringBoot2, Update Log Levels At Runtime

I had a requirement where I wanted to create a user interface to dynamically update the spring boot 2 log levels, without having to restart the spring boot service (service)
This can be done by adding the spring boot actuator plugin.
Actuator brings production-ready features to our application.

Heres a good article that explains about the actuator:
http://www.baeldung.com/spring-boot-actuators

More features on how to use the actuator can be found here:

https://docs.spring.io/spring-boot/docs/2.0.x/actuator-api/html/

Note: The actuator service eventually should sit behind a security domain and context so that these services wont be exposed to the public. This article will not cover that right now.


Here's a step by step approach to dynamically set the log levels


1.  Add the actuator library:


     compile("org.springframework.boot:spring-boot-starter-actuator")


2.  In the application properties, add you logging configuration and make sure to enable all the actuator end points.

logging.level.org.springframework.web=ERROR
logging.level.org.hibernate=ERROR
logging.file=testing-features.log
management.endpoints.web.exposure.include=*


3.  Implement a simple controller that will print a log to your log file
@RestController
public class TestController {

    private Logger log = LogManager.getLogger(TestController.class.toString());
    @RequestMapping(value = "/service", method = RequestMethod.GET)
    public ResponseEntity<String> callService(){


        log.info("Service Called");
        return ResponseEntity.ok("Hello World");    }
}

4. View the root loggers log level:
http://localhost:8080/actuator/loggers/root

5. Update the root loggers log level by sending a post request.
Use postman to send a POST request.


Sunday, May 27, 2018

Git Merge Vs Rebase

I have used the below steps to test Git Merge and Git Rebase.

1) Init Master,
2) Init Branch.
3) Commit "1", in Branch. . 
4) Commit "2"  in Master. 
5) Commit "3" in Branch. 

Git Merge:  

"Your repository’s commit history is a record of what actually happened."

git checkout mybranch
git merge master 


Note in the above diagram, I have merge the master into branch.


Note that, the second commit is applied after the third commit in my branch, and a new merge commit is created.


Git Rebase:  

"The repository's commit history is the story of how your project was made."

git checkout mybranch
git rebase master. 

Here I have rebased mybranch onto master

Now here instead of using a merge commit, rebasing re-writes the project history by creating brand new commits for each commit in the original branch.


See that all the branch history is applied on top of master log history.


Way to use

In general the way to get the best of both worlds is to rebase local changes you’ve made but haven’t shared yet before you push them in order to clean up your story, but never rebase anything you’ve pushed somewhere.

Wednesday, May 9, 2018

Dependency Injection, Field, Setter, or Constructor Injection

I was doing some investigation on the different approaches of Dependency Injection in the Spring Framework. Following is a summary of content that I gathered from various websites.


Inversion of Control (IOC)

IoC enables a framework code,  to take control of the flow of a program and make calls to our custom code.


Dependency Injection

Dependency injection is a pattern through which to implement IoC.

The act of connecting objects with other objects, or rather “injecting” objects into other objects, is done by a the framework code  rather than by the objects themselves


Field Injection


Using field injection makes it hard to test , because we do not have a way to inject our dependency into the class we are testing, and we would have to rely on the IOC container to inject this dependency for us.


One of the purposes of Dependency Injection is to decouple code, which in turn should make the code easier to test.

However, it is worthwhile noting that field injection makes the code more elegant than setter or constructor injection.


Setter Injection


In this approach, we can not guarantee that our class would have injected the dependency. However note that, It is good to use setter injection when the dependencies are optional.


This blog Repeat After Me: Setter Injection is a Symptom of Design Problems explains further the disadvantages of using setter injection. 

Another blog explaining why setter injection is not a good idea is Setter injection sucks.

I came across this blog: Constructor vs Setter Injection, happen to explain why setter injection is preferred over constructor injection.


Constructor Injection

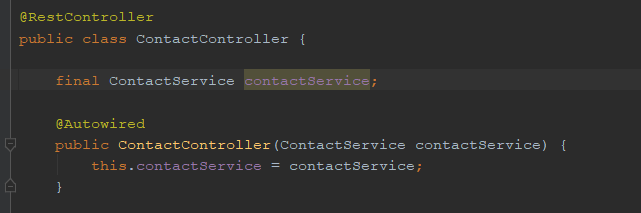
Constructor Injection guarantees that the dependency is injected during class creation.


This blog: One correct way to do dependency injection explains why constructor injection is a better option over setter injection.

Tuesday, December 5, 2017

GIT Branching Model

Idea Extracted from this website as I had the liberty to learn from it and apply it to my personal projects as well as in some of the organizations I work for.

The details are summarized as follows:


Overall picture:


Main branches:

  • MASTER 
  • DEVELOP


We consider origin/master to be the main branch where the source code of HEAD always reflects a production-ready state

We consider origin/develop to be the main branch where the source code of HEAD always reflects a state with the latest delivered development changes for the next release. Some would call this the “integration branch”. This is where any automatic nightly builds are built from

When the source code in the develop branch reaches a stable point and is ready to be released, all of the changes should be merged back into master somehow and then tagged with a release number.

Other Branches

  • Feature branches
  • Release branches
  • Hotfix branches


Unlike the main branches, these branches always have a limited life time, since they will be removed eventually.

Feature:
May branch off from: develop Must merge back into: develop

Finished features may be merged into the develop branch to definitely add them to the upcoming release.

Release:
May branch off from: develop Must merge back into: develop and master
It is exactly at the start of a release branch that the upcoming release gets assigned a version number—not any earlier.
This new branch may exist there for a while, until the release may be rolled out definitely. During that time, bug fixes may be applied in this branch (rather than on the develop branch).

When the state of the release branch is ready to become a real release, some actions need to be carried out. First, the release branch is merged into master (since every commit on master is a new release by definition, remember). Next, that commit on master must be tagged for easy future reference to this historical version

Finally, the changes made on the release branch need to be merged back into develop, so that future releases also contain these bug fixes.

Hotfix:
May branch off from: master Must merge back into: develop and master

When finished, the bugfix needs to be merged back into master, but also needs to be merged back into develop, in order to safeguard that the bugfix is included in the next release as well. 

Saturday, December 2, 2017

React Redux Concepts

Redux is a tool for managing both data-state and UI-state in JavaScript applications.

Redux attempts to make state mutations predictable by imposing certain restrictions on how and when updates can happen.

Core principals:


  1. The state of your whole application is stored in an object tree within a single store.
  2. The only way to change the state is to emit an action, an object describing what happened.
  3. To specify how the state tree is transformed by actions, you write pure reducers. Reducers are just pure functions that take the previous state and an action, and return the next state. 


What React Solves:


Component to Component communication is hard in react, as data flows from top to bottom.


For communication between two components that don't have a parent-child relationship, you can set up your own global event system. ... Flux pattern is one of the possible ways to arrange this.


React solves the above problem by introducing a global store. Components then "dispatch" state changes to the store, not directly to other components. The components that need to be aware of state changes can "subscribe" to the store:


npm install --save redux react-redux  

Monday, July 3, 2017

Wildfly 10.1 Webservice Security with Custom Login Module

source code:   https://github.com/byorn/wildfly-webservice-security


A Sample EAR extracted from the Wildfly Quickstarts can be found from the above source.


It contains a @Webservice and @SecurityDomain, protecting the @Webmethod with defined roles.

In the project's EJB Section, is the Module DelegationLoginModule.

This is a custom Login Module. All the information on how to authentication the user name and password is described in the source comments.


The Standalone.xml in Wildfly10 should have this configuration:


<security-domain name="other" cache-type="default">
                    <authentication>
                        <login-module code="byorns.com.login.module.DelegationLoginModule" flag="required">
                            <module-option name="password-stacking" value="useFirstPass"/>
                        </login-module>
                    
                    </authentication>
                </security-domain>

web.xml should have
<login-config>
   <auth-method>BASIC</auth-method>   <realm-name>RealmUsersRoles</realm-name></login-config>


Test with SOAP UI, Basic Authentication:


For more security related debugs:

Add the logger in Standalone.xml

 <logger category="org.jboss.security">
                <level name="TRACE"/>
</logger>

Sunday, May 14, 2017

Starting React Development

The quickest way to get started with react is to follow the official react tutorial.

Firstly you would want to make sure you have Node installed in your machine.
To download Node, go to: https://nodejs.org/en/download/

If you already have node installed, make sure it is updated to its latest version:

> npm install npm@latest -g

Next create the skeleton react app using create-react-app program

> npm install -g create-react-app
> create-react-app my-app

> cd my-app
> npm start  


To work with React Projects, I use ATOM with added plugin Language-Babel package.

To Build React for Production use:
> npm run build

This will create a build folder and the index.html and its contents can be hosted in production.

To run it, you can install the serve program

> npm install -g serve
> serve -s build

Note: 
create-react-app uses Webpack underneath it to  bundle your code and all its dependencies, It also uses also uses Babel to Tranform next generation java script (llike es6) to browser compatible java scripts

Tuesday, April 25, 2017

REACT Basic Concepts

React is a UI library.

Its focuses on  interactive, stateful & reusable UI components.

A Unique selling point about REACT  is that not only does it perform on the client side, but it can also be rendered in server side, and they can work together inter-operably.

React has the a concept of the Virtual DOM. Based on state changes, only selected subset of the dom elements are updated. (Least amount of dom manipulation is required, with the use of the Virtual DOM)

React uses JSX (Javascript XML syntax transform)  to write HTML Tags in Java Script. This is similar concept of Angular's Templates.


Rendering


var MyComponent = React.createClass({
    render: function(){
        return (
            <h1>Hello, world!</h1>
        );
    }
});

ReactDOM.render(
    <MyComponent/>,
    document.getElementById('myDiv')
);

ReactDOM’s render method above, our first argument is the component we want to render, and the second is the DOM node it should mount to.


State

Every component has a state object and a props object.
State is set using the setState method. Calling setState triggers UI updates.If we want to set an initial state before any interaction occurs we can use the getInitialState method.


In React, application data flows unidirectionally via the state and props objects, as opposed to the two-way binding of libraries like Angular.  This means that, in a multi component heirachy, a common parent component should manage the state and pass it down the chain via props.  

In a hierarchichal component structure, the state of the component should be updated using the setState method to ensure that a UI refresh will occur. The resulting values should be passed down to child components using attributes that are accessible in said children via this.props

Sunday, February 19, 2017

Adding Oracle's JDK to Ubuntu 14.04

1) Download JDK, and install it into any directory of your choice, mine was /home/byorn/Programs/java/

2) sudo update-alternatives --install "/usr/bin/java" "java"  "/home/byorn/Programs/java/jdk1.7.0_21/bin/java" 1


3) sudo update-alternatives --config java

and select your option.
To Test type:  java -version

Wednesday, January 20, 2016

Generate a Spring Boot SOAP Webservice from a provided WSDL

I was faced with a task to generate a SOAP Web Service in Spring Boot. The system we wanted to integrate with provided us with a WSDL file to be hosted in our end, so that, that system can call the services in our system.


Producing a SOAP Web service in Spring Boot is pretty straight forward if you follow the instructions on their website: https://spring.io/guides/gs/producing-web-service/.

However, the problem I was facing is that , instead of an XSD, I had a WSDL.

In order to generate the API's and host the WSDL, there were slight changes from the usual process as mentioned in the above link.

Here are those changes.

1) In the Maven POM file

<plugin>
<groupId>org.codehaus.mojo</groupId>
<artifactId>jaxb2-maven-plugin</artifactId>
        <version>1.6</version>
        <executions>    
               <execution>      
<id>xjc</id>      
<goals>
          <goal>xjc</goal>
      </goals>
      </execution>
</executions>
    <configuration>  
 <packageName>com.abc.webservice.api</packageName>
   <wsdl>true</wsdl>
     <xmlschema>false</xmlschema>
    <schemaFiles>service.wsdl</schemaFiles>
    <schemaDirectory>${project.basedir}/src/main/resources/</schemaDirectory>
    <outputDirectory>${project.basedir}/src/main/java</outputDirectory>
  <clearOutputDir>false</clearOutputDir>
   </configuration>
</plugin>


2) The service.wsdl has to be kept in the /src/main/resources/ folder.

3)Note changes in the WebServiceConfig
@Configuration @EnableWs
public class WebServiceConfig extends WsConfigurerAdapter {
 @Bean
 public ServletRegistrationBean messageDispatcherServlet(ApplicationContext applicationContext) {
  MessageDispatcherServlet servlet = new MessageDispatcherServlet();
  servlet.setApplicationContext(applicationContext);
  servlet.setTransformWsdlLocations(true);
  return new ServletRegistrationBean(servlet, "/ws/*");
 }

 @Bean(name = "countries")
 public Wsdl11Definition wsdlDefinition() {
  SimpleWsdl11Definition wsdl11Definition = new SimpleWsdl11Definition(); 
wsdl11Definition.setWsdl(new ClassPathResource("service.wsdl"));
return wsdl11Definition; }

Wednesday, December 23, 2015

Reactive Programming - Introduction

What is Reactive Programming?

If a program propagates all the changes that modify its data to all the interested parties (users, other programs, components, and subparts), then this program can be called reactive.

Simple Example:

int a = 4;
int b = 5;

int c = a + b; System.out.println(c); // 9
a = 6; System.out.println(c); // 9 again,

but if 'c' was tracking the changes of 'a' and 'b', // it would've been 6 + 5 = 11; Therefore this is not reactive.

Why should we be reactive? 


In the past it was normal for websites to have a slower response time, but in the current day, we have to deal with high response to the user.
eg:  "likes" to some content can be reflected in real time to other connected users, and so forth.  In most cases, these applications communicate with a large number of remote services as well. 

How to be reactive ?


Modular/dynamic - because modules can go offline and come online without breaking or halting the entire system - Being modular means the system should be   event-driven.  We can divide the system into multiple micro-services/components/modules that are going to communicate with each other using notifications
Scalable: This way, we are going to be able to handle a huge amount of data or large numbers of user requests.  - to react to load without falling apart.
NOTE:  You can build a message-driven, resilient, scalable, and responsive application without using a reactive library or language.

Reactive Programming With Java?


(https://github.com/ReactiveX/RxJava), an open source Java implementation of the reactive programming paradigm. Writing code using RxJava requires a different kind of thinking, but it will give you the power to create complex logic using simple pieces of well-structured code.

Example:

List<String> list = Arrays.asList("One", "Two", "Three", "Four", "Five");

//RXJava Observable

Observable<String> observable = Observable.from(list);
  
// Subscribe to the Observable. It will PUSH it's values to the Subscriber, and it //will be printed.

observable.subscribe(new Action1<String>() {

   public void call(String element) {
    System.out.println(element);
   }
  }, new Action1<Throwable>() {
   public void call(Throwable t) {
    System.err.println(t); 
   }
  }, new Action0() {
   public void call() {
    System.out.println("We've finnished!"); 
   }

  });


Here, we can subscribe to the Observable instance. By subscribing, we tell RxJava that we are interested in this Observable instance and want to receive notifications from it. We subscribe using an anonymous class implementing the Action1 interface, by defining a single method—call(T). This method will be called by the Observable instance every time it has a value, ready to be pushed. Always creating new Action1 instances may seem too verbose, but Java 8 solves this verbosity.

So, every string from the source list will be pushed through to the call() method, and it will be printed


This is just an introduction:
Please find here for more info.
https://github.com/meddle0x53/learning-rxjava

Sunday, August 23, 2015

Microservices and Spring Boot


A typical architecture would be a WAR file where everything is packaged all in one. This file can be as big as 50 MB to more than 300MB.

Problems with a monolith architecture like this is :

  • High Budget,
  • Long release cycles
  •  Difficult to understand a large code base which means it is relatively expensive to change and difficult to scale


The solution for the above is a Microservices architecture, where instead of you building one big large app, you build separate smaller apps, each handling its own business domain.


Benefits of the above architecture is that

  • Small budget - Smaller teams needed.
  • shorter release cycles
  • cheap to change or rewrite, as the apps you work on a sufficiently smaller
  • Easier to scale, - depending on high load, only the required modules can be deployed to more servers, unlike in a monolith app, the whole app gets impacted. Therefore in a micro-service architecture you can make use of your infrastructure wisely.
  • Faster return on investment as it is easier and faster to deploy smaller apps into production
  • Easier to understand a smaller code base.


To achieve the above benefits you need a light weight framework and deployment infrastructure.

Spring Boot makes it easier to create standalone production-grade spring based application that you can simply "just run" , and there is no need to deploy WAR files. The spring boot framework automatically configures a server for you. It has embedded Tomcat or Jetty. 

It also has production ready features for monitoring like metrics, health checks and externalized configuration. You can even ssh to your spring boot app and also has easy connectivity to open source PAAS cloud foundry.

For more information: http://projects.spring.io/spring-boot/

Monday, June 29, 2015

ESB Architecture and JBoss ESB

ESB Architecture

How does an ESB differ from an Application Server? Generally an application server will consist of Servlets, EJBS, Webservices, JCA Components (For connecting to databases), and can also have a persistence layer like  JPA/Hibernate. Application servers can also be extended to have rules engines like Drools etc. A typical application server architecture would look like:

However, in a typical enterprise, a system may have to deal with multiple other systems, running on multiple clusters and external distributed environments. For example some of these external systems may include a Billing System, an Inventory System, an Accounting System and a CRM, and this is where an ESB Architecture fits in.

An ESB System, provides a set of tools for synchronizing/orchestrating  the communication between these external systems. Note: Some of these external systems may not be in Java, and may involve other technologies like .NET, Php/Lamp, or other legacy technologies. Also communicating between these systems may not simply be RMI or JMS Messages in a Java Environment. It may also involve communicating using SOAP/XML messages over a Web service or Restful interface, or simply reading file in different formats over an FTP link.


JBoss ESB

Sunday, April 26, 2015

Restful Web services with Spring Boot, Java EE 7, Angular JS and MongoDB

During this month of April I was able to experiment with Restful web service
implementations with Java Web Profile 7, Hypermedia-Driven RESTful Web services  with Spring Boot, Angular JS, Bootstrap and Mongo DB.

I was able to create two Restful projects.

1) A Java EE 7, MongoDB , Bootstrap CRUD single page web app that uses additional JQuery and Bootstrap plugins in the front end. The sample application and instructions on how to setup the application can be accessed from here


2) A Spring Boot , Mongo DB , Bootstrap CRUD Single page web app that calls Hypermedia based Restful Services. The front end is powered and made  more structured with Angular JS. This application source can be accessed from here


Sunday, March 22, 2015

How to hot deploy Spring MVC - Spring Boot Application in Intelij

  • Create your first Spring MVC / Spring Boot application by cloning the    sample project provided in Spring's web site 
  •  In IntelliJ open the Maven project
  • mvn clean install 

  • Right click the Application.java class and simply run it in Intellij.

  • Notice that once you access the application from http://localhost:8080/greeting  and if you do any changes  to the files in src/main/java/resources/templates/greeting.html; those changes do not get reflected unless you do a restart.

  • However if you create a webapp folder and have an index.jsp under i.e. src/main/webapp/index.jsp  and make changes to that file; then  you will be able to dynamically see any changes done to it with a simple page refresh in the browser. Note: Its simply the files under src/main/java/resources/ that do not reflect changes. To overcome this, and to achieve class level and resource level changes to hot deploy ..

  • We are going to add the springloaded plugin. Add the plugin dependency as follows:
    <plugin>
    <groupId>org.springframework.boot</groupId>
    <artifactId>spring-boot-maven-plugin</artifactId>
    <dependencies>
    <dependency>
    <groupId>org.springframework</groupId>
    <artifactId>springloaded</artifactId>
    <version>1.2.0.RELEASE</version>
    </dependency>
    </dependencies>
    </plugin>

  • Do a mvn clean install and make sure the jar is downloaded to your m2 repository.

  •  Next copy the downloaded jar file from the repository to your  root folder of your application.
  • In Intelij -> Run configuration -> Specify VM arguments :
       -Djavaagent:springloaded-1.2.0.RELEASE.jar -noverify
       
        note: you can also give the path like c:\\myfolder\\springloaded.jar
       so it will be like
       -Djavaagent:c:\\myfolder\\springloaded.jar -noverify.
  •  inside src/main/java/resources folder create a new file application.properties.    Its contents should have two properties :
spring.template.cache=false
spring.thymeleaf.cache=false

 
  • shut down the servers and run the application again. Do class level changes and make changes to the /java/resources/templates/greeting.html . After doing the changes make sure to run MAKE to compile the classes.

  • Changes will be reflected immediately in the browser without having to rerun the Application.java.

Friday, February 13, 2015

Mocking and Stubbing and using PowerMock

Unit testing  is when developers adhere to a practice of testing units of code. There are many benefits in writing unit tests, specially when it is done in TDD (Test Driven Development) as an agile practice. However in this article I am not going to describe the many benefits of unit testing as that information is already flooding the internet.  Even though Martin Fowler, in his article  explains the differences between Test Doubles (Mocks, Stubs, Dummy and Fake Objects), in this article I intend to focus on the subtle difference between Stubbing and Mocking.

My understanding is that Mocks and Stubs are there to eliminate testing all the dependencies so that it would be easy for us to focus on the unit of code that we want to test. Which means that these dependencies are either mocked or stubbed.

The main difference between mocking and stubbing to me is that, when Mocking we pre-program behavior.  Basically we have the flexibility to tweak the behavior or create our own expectation on how the collaborating classes should behave for every scenario that we want to test.
This means that when mocking, during verification stage we get to perform behavior verification.  i.e we ensure that  "class under test" would make the  correct calls to the collaborating classes,in a fashion that we have defined.  

Stubs:  are also already pre-programmed code as well; but they have a fixed response.  However in Martin Fowler's, assay, it is mentioned that Stubs can also perform behavior verification. They are known as spy objects.

According to this Vedio; basically you can clearly differentiate a Mock from a Stub , is when you know that Mocks do verification of the interaction. Stubs simply are just used for faking.

In most legacy systems, and to my experience I have come across many tightly coupled code with legacy system frameworks. Code that has been so tightly coupled that it sometimes makes the code truly untestable. 
I found Powermock a useful library for unit testing, as it has the facility to mock static, and private methods as well. Please checkout my github repository here.